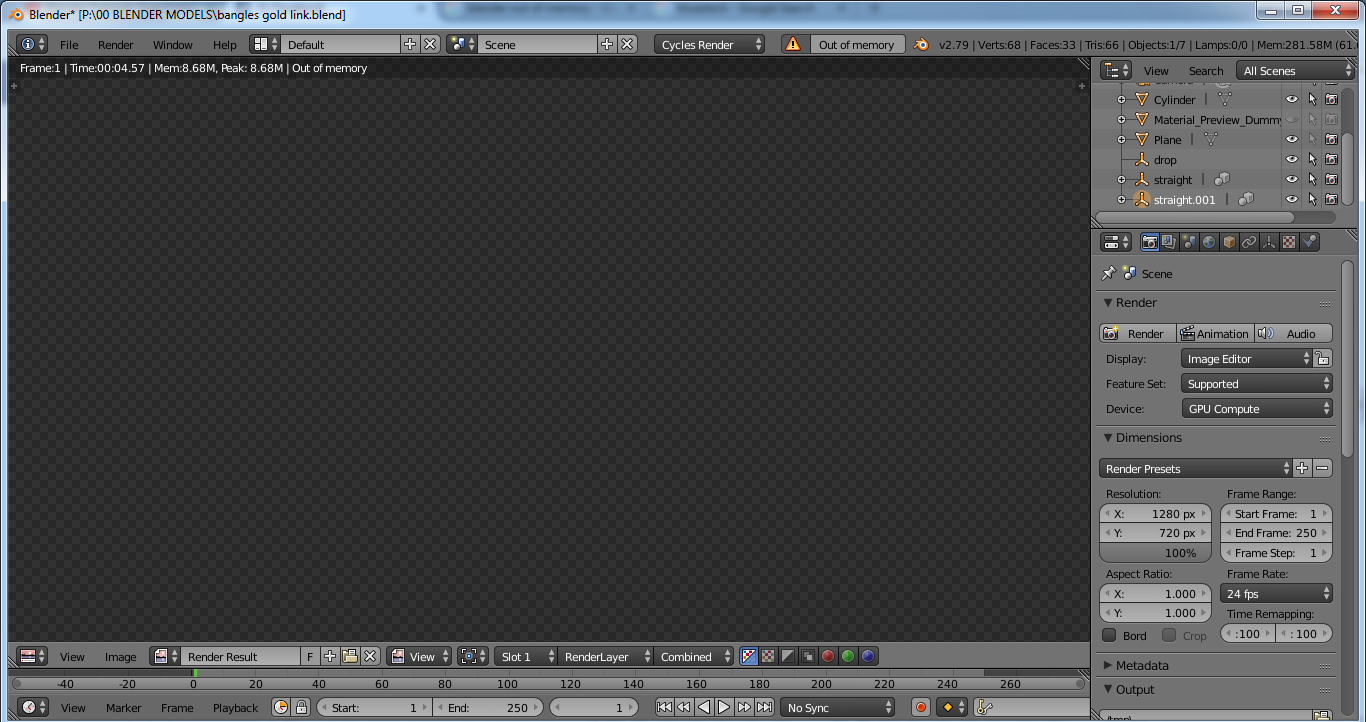
After a lot of effort, your favorite picture was completed and ready to get rendered. Suddenly, you find that it is taking longer for the GPU to render than usual, with scene crashes or incorrect rendering occurring more frequently. This indicates that your GPU rendering process needs to be optimized. Reducing memory usage is highly recommended to make the GPU rendering process more optimal.
RAM’s effect on rendering speed
RAM capacity doesn’t affect the render process that much. What is most responsible are the CPU and GPU. However, if your system has insufficient RAM and you extend it to more capacity you will notice a difference in GPU rendering speed. It will allow your system to allocate more resources in RAM and thus work more efficiently. Better GPU render speed is essential in many ways to meet deadlines, to save GPU rental cost, and ultimately save time.
Why does RAM usage have to be reduced?
A major loss an artist can cause is a scene crash due to high RAM usage. A very slow render process is another major issue that may arise due to high RAM consumption. This is because the program continuously needs to read and write temporary data from the hard drives and hard drives are much slower than RAM.
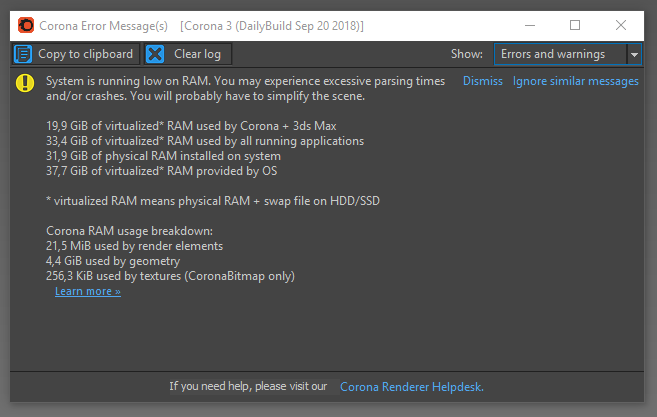
Another loss could happen due to a sudden rise in RAM usage including error messages popping up, flickering windows, incorrect rendering, system slowdown, etc. High memory consumption can be reduced by applying some tricks before initiating the rendering process, and this is especially important for GPU rendering.
A GPU can process tasks simultaneously instead of linearly as in a CPU. This kind of parallelization makes it ideal for processing renders, where an image can be rendered in sections at the same time.
However, instead of relying on RAM, GPUs use their own memory, called VRAM. GPUs ship with a limited amount of VRAM. Even if it is possible to use multiple graphics cards in GPU rendering, a render engine will only use the VRAM of the card with the smallest amount of RAM.
New technology such as NV-Link addresses this issue by making it possible for multiple GPUs to utilize each card’s VRAM, but an optimized scene will always lend itself well to the rendering process.
Ways to optimize VRAM and reduce it’s usage during GPU render process
-
Choose the best Graphics Card
A rendering program heavily relies on GPU cards to create the user interface. If you often render complex scenes but your system has an inadequate graphics card then it is time to upgrade the one. It doesn’t matter how efficient the system RAM is if your graphics card is not a convenient one. It’s best to identify your needs and replace your old graphics card with an efficient one. Graphics cards VRAM (Video- Random Access Memory) is integrated into a graphics card. It processes the tasks simultaneously instead of linearly as the CPU does. Such parallelization makes it faster to process renders. An image can be rendered in various sections at a time. So, whenever graphics power is required VRAM is utilized. A graphics card relies on its VRAM and stores graphical textures and 3D models in it.
-
Upgrade RAM
While a GPU rendering program uses VRAM from graphics cards, several processes indirectly rely on your system RAM. Some GPU rendering software can make use of the CPU’s resources as well, such as V-Ray and Blender’s Cycles’ Hybrid Rendering features. Out-of-core offloading features in engines like Pro Render also allow elements like textures to be first stored in RAM and incrementally loaded into VRAM to avoid memory choking.
Generally, 16 GB may be enough for beginners doing basic 3D work. 32 GB RAM is ideal for most 3D artists or to intermediate-level artists. For the experts where large textures or complex scenes have to be rendered or when you are working on high-poly meshes 64 GB of RAM is recommended.
If you want to learn more about choosing the best hardware for 3d rendering, read this guide: How to choose the best hardware for a 3D artist.
-
Manage Polycount
A higher number of polycounts increases the rendering file size. A big file needs more VRAM to get rendered. Large files also take more time for the GPU render process. It is not a big deal when rendering locally but it takes more time in network rendering. In commercial rendering farms, longer rendering time means higher cost. As with textures, the level of subdivision for objects farther away can be reduced.
-
Check and close unnecessary applications
Running multiple applications on your computer remains unnoticed several times which consumes a lot of system memory without doing any productive function. So, before initiating GPU rendering, the unnecessary application has to be checked and terminated. This can save a lot of memory spent on those applications. Saved GPU VRAM can be utilized to enhance the functioning of the 3D rendering process. While rendering on the network using GPU rental service, keeping unnecessary applications running can interrupt the rendering process. Xesktop provides constant support to all 3D artists who wanna use GPU rental service.
If you want to learn more about what GPU server rental service is, read this article: A guide to GPU Server Rentals for 3d Artists, for more information, visit Xesktop, where you can find a step-by-step video showing how to connect to a remote server.
-
Explore and change unwanted rendering settings
Each rendering software comes with its custom setting. Usually, most artists overlook those settings. But if you consider it and discover your software’s settings’ area you’re gonna find some settings consuming a lot of your GPU memory and time as well. Some settings consume VRAM or time but do not contribute to the GPU rendering process at all.
Here you only have to explore such settings and change them to another better option. When talking about settings some newbies or even experienced artists may go for some extravagant settings such as polycount, sampling, and quality this can lead to increased rendering time.
-
Reducing texture size according to distance
Usually, texture like things takes up most of the storage. reserve image textures for objects closer to the camera, anything farther back or blurred by Depth of Field will not need the detail a large map provides. It is better to use compressed texture formats to reduce file size. If that fails to reduce enough file format try to reduce its physical size in pixels of texture images. Use compressed texture to reduce texture size.
-
Optimize modifiers
The higher number of polys in the model should be reduced by exploring the settings of modifiers. However, it depends on the distance of the object from the camera and some other factors about the object. High polygons are only required when you need to create more detail in the model. Objects without certain shapes like ocean waves don’t need to keep their exact shape here modifier settings can be applied to reduce polygon counts. So that it will minimize VRAM consumption.
Several modifiers you can optimize to enhance the rendering process are MultiRes Modifier, Prooptimizer Modifier, Optimize Modifier, Batch ProOptimizer Utility. Check the given links to learn more about these modifiers.
-
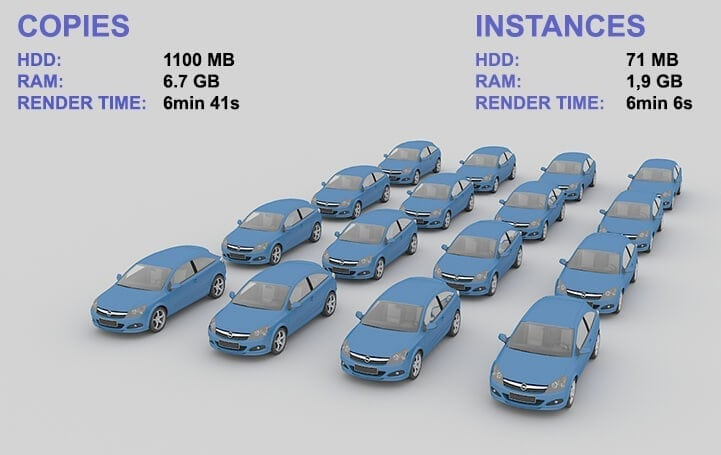
Use instancing
Objects that repeat in the scene such as clumps of grass, bricks, or trees can be instances of one object, and will only require the approximate amount of RAM to render the source object. When you copy a mesh GPU render program creates another mesh and it will be stored in your scene on RAM and hard drive, which increases the polycount numbers.
Though, when you create an “instance”, a GPU render program will only store the information that a copy of a mesh is available at another location in the scene but will only store data of a single mesh in the scene file and memory. By using instancing one can put a large number of copied objects in the scene but the same amount of VRAM will be used having the same file size as a single object.
-
Separate elements of the scene
Rendering foreground, middle ground, background separately and compositing them together after can make a complex scene renderable on a GPU. The same could be done for other memory intensive elements like hair. This makes it easy to apply modifiers to the model if required. This results in increased rendering speed required to minimize cost when rendering on the network using GPU rental service.
-
Mesh and Animation compression
Meshes and Animation compression is better to reduce the load on CPU and GPU. You can set the Mesh compression to low, medium, or high levels by experimenting with what level of Mesh compression is optimal for your model. Quantization is used for mesh and animation compression that takes up less storage but compression can cause imprecision.
-
LOD and per-layer cull distances
It makes objects invisible by culling the objects. It is another way to reduce the burden of CPU and GPU. In most games, a quick and effective way to do this without compromising the gamer’s experience is to move smaller objects more aggressively than larger ones. Like, small rocks may disappear over long distances, while larger buildings will still be visible.
-
When to collapse models
Before rendering the scene, models with optimizing modifiers need to be collapsed. This reduces VRAM consumption, file size on the hard drive, and render times. While rendering using a GPU rental service, render speed matters to save cost. However, models with modifiers that increase mesh resolution are better not collapsed, since mesh density can be corrected if too high, while the files burden the hard drive less.
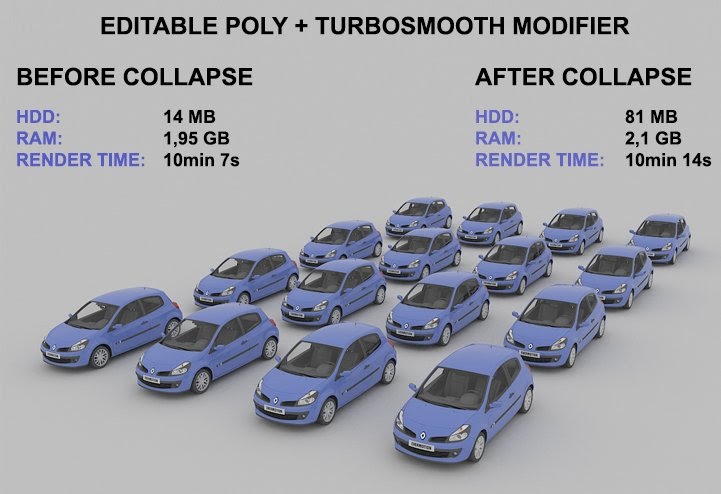
Image: A comparison of resource utilization when models rendered by applying Meshsmooth modifier on them vs model after collapsing the stack to an Editable Poly. The models are copied as instances. Learn more from the article: Optimizing scenes in 3ds Max through geometry
Quick checklist for enhanced 3D rendering experience
- Share as many materials among various objects as possible
- Minimize texture map size where possible
- Optimize distant geometry using poly-reducing modifiers
- Use instances for duplicate models
- Close unnecessary applications
References:
Video reference:
https://youtu.be/3Hkm7XJ1B9k
article references:
https://www.easyrender.com/a/3d-rendering-and-how-to-optimize-your-approach-for-maximum-speed
https://www.videomaker.com/how-much-ram-do-you-need#
https://docs.unity3d.com/Manual/OptimizingGraphicsPerformance.html
https://docs.unity3d.com/Manual/ReducingFilesize.html